파이썬[Python]: kivy - BindTexture 클래스
kivy.graphics 모듈 - BindTexture 클래스(class)
/// 설명
Texture 를 연결(bind)하여 줍니다.
참고: graphics 모듈 목록
※ 형식
BindTexture(**kwargs)
reference
https://kivy.org/doc/stable/api-kivy.graphics.html
https://kivy.org/doc/stable/examples/gen__canvas__multitexture__py.html
참고: graphics 모듈 목록
※ 형식
BindTexture(**kwargs)
reference
https://kivy.org/doc/stable/api-kivy.graphics.html
https://kivy.org/doc/stable/examples/gen__canvas__multitexture__py.html
/// 예제
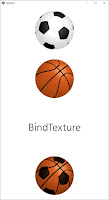
1 2 3 4 5 6 7 8 9 10 11 12 13 14 15 16 17 18 19 20 21 22 23 24 25 26 27 28 29 30 31 32 33 34 35 36 37 38 39 40 41 42 43 44 45 46 47 48 49 50 51 52 53 54 55 56 57 58 59 60 61 62 63 64 65 66 67 68 69 70 71 72 73 74 75 76 77 78 79 80 81 82 | import kivy kivy.require('2.0.0') from kivy.app import App from kivy.base import EventLoop from kivy.core.window import Window from kivy.graphics import RenderContext, Color, \ Rectangle, BindTexture from kivy.uix.widget import Widget from kivy.uix.boxlayout import BoxLayout from kivy.uix.image import Image from kivy.uix.label import Label Window.clearcolor = (1, 1, 1, 1) Window.size = (563, 1001) Window.top, Window.left = 30, 2900 fs_multitexture = ''' $HEADER$ // New uniform that will receive texture at index 1 uniform sampler2D texture1; void main(void) { // multiple current color with both texture (0 and 1). gl_FragColor = frag_color * \ texture2D(texture0, tex_coord0) * \ texture2D(texture1, tex_coord0); } ''' class CustomWidget(Widget): def __init__(self, **kwargs): # Before doing anything, ensure the windows exist. EventLoop.ensure_window() self.mixture() self.bind(size=self.update) # get real size of class CustomWidget super(CustomWidget, self).__init__(**kwargs) def update(self, instance, value): # centered image self.rect.pos = ((self.size[0] - self.rect.size[0]) / 2, (self.size[1] - self.rect.size[1]) / 2) def mixture(self, *args): # all the necessary information for drawing self.canvas = RenderContext() # setting shader.fs to new source code automatically compiles it. self.canvas.shader.fs = fs_multitexture with self.canvas: Color(1, 1, 1) # create a rectangle with texture (index 0) self.rect = Rectangle(size=(200, 200), source='football.png', pos=self.center) # binding a custom texture (index 1) BindTexture(source='basketball.png', index=1) # set the texture1 to use texture index 1 self.canvas['texture1'] = 1 # the default vertex shader self.canvas['projection_mat'] = Window.render_context['projection_mat'] class FantasticApp(App): def build(self): bl = BoxLayout(orientation='vertical') bl.add_widget(Image(source='./football.png')) bl.add_widget(Image(source='./basketball.png')) bl.add_widget(Label(text='BindTexture', color='black', font_size=50)) bl.add_widget(CustomWidget()) return bl FantasticApp().run() | cs |
/// 출력
* 실행환경: Microsoft Windows 10 Homes
* 인터프리터: 파이썬(Python 3.9)
– 당신을 응원합니다. –

댓글
댓글 쓰기